
Minwax Stain Chart at a Glance
| Product | Minwax Wood Finish (oil-based penetrating stain) |
| Colors available | 36 standard; 240+ in the Color Series |
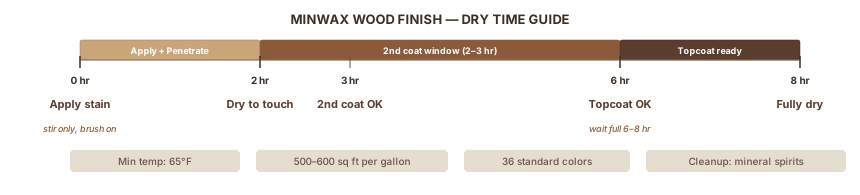
| Dry to touch | 2 hours |
| Ready for topcoat | 6–8 hours |
| Application temp | 65°F minimum |
| Most popular color | Dark Walnut (2716) |
| 2026 Color of the Year | Special Walnut (224) |
Minwax makes 36 oil-based wood stain colors, plus 240+ custom-tinted options. The color you pick will look different depending on your wood species. For the full application process for oil-based stain, see Oil-Based Wood Stain. On red oak especially, every color runs warmer than the swatch shows. This guide covers every color, shows how each behaves on common wood species, and gives you the specs to apply them correctly.
In this guide:
- Full color chart — all 30+ Minwax colors with numbers
- How each color looks on red oak specifically
- Species guide: oak, pine, maple, poplar, birch
- Application steps and dry times
- Gel stain vs. oil-based — which formula to buy
Part 1: The Complete Minwax Stain Color Chart
Minwax Wood Finish (oil-based) is the stain most people mean when they say "Minwax." It penetrates into the wood grain and leaves a semi-transparent color layer. Unlike paint, it sits below the surface, so the wood's natural grain shows through.
The Minwax Wood Finish product page currently lists 36 named colors. The original 24 have fixed three-digit color numbers, which you'll see printed on every can. A comprehensive list of classic colors with numbers is also maintained by A-American Custom Flooring, a flooring reference that has tracked the Minwax line for decades.
| Color Name | Number | Family | Character |
|---|---|---|---|
| Natural | 209 | Light/Natural | Clear tint; shows wood's own color |
| Golden Oak | 210B | Light Warm | Honey-golden |
| Puritan Pine | 218 | Light Warm | Yellow-pine tone |
| Golden Pecan | 245 | Light-Medium Warm | Light warm pecan |
| Pickled Oak | 260 | Light Cool | Whitewash effect |
| Ipswich Pine | 221 | Medium Warm | Amber-pine |
| Gunstock | 231 | Medium Warm | Warm honey-amber |
| Fruitwood | 241 | Medium Warm | Warm amber-brown |
| Colonial Maple | 223 | Medium Warm | Amber-brown |
| Red Oak | 215 | Medium Warm | Warm orange-brown |
| Early American | 230 | Medium Warm | Earthy warm brown; outstanding on oak |
| Provincial | 211 | Medium Neutral | Warm balanced brown; most versatile |
| Nutmeg | — | Medium Neutral-Warm | Neutral warm brown |
| Special Walnut | 224 | Medium Neutral-Warm | Rich medium brown; 2026 COTY |
| English Chestnut | 233 | Medium Brown | Classic brown |
| Sedona Red | 222 | Red | Reddish copper-brown |
| Red Chestnut | 232 | Medium Red-Brown | Warm reddish-brown |
| Cherry | 235 | Medium Red | Cherry-toned red |
| Red Mahogany | 225 | Dark Red | Deep red-brown |
| Dark Walnut | 2716 | Dark Warm | Deep rich brown; most popular overall |
| Weathered Oak | 270 | Light Cool/Gray | Gray-wash/driftwood look |
| Classic Gray | 271 | Light-Medium Gray | Contemporary gray-brown |
| Driftwood | 2126 | Light Gray-Beige | Soft weathered gray |
| Phantom Gray | — | Medium Gray | Cool balanced gray |
| Jacobean | 2750 | Dark Cool | Dark with green-cool undertones |
| Ebony | 2718 | Very Dark | Near-black; dramatic |
| True Black | 274 | Very Dark | Black |
| Simply White | — | Very Light | Whitewash |
| Navy | — | Blue-Dark | Blue-tone dark |
| Vintage Blue | — | Blue-Medium | Blue-wash effect |
Quick Navigation by Color Family
If you know the look you want, start here:
| Family | Colors in This Group |
|---|---|
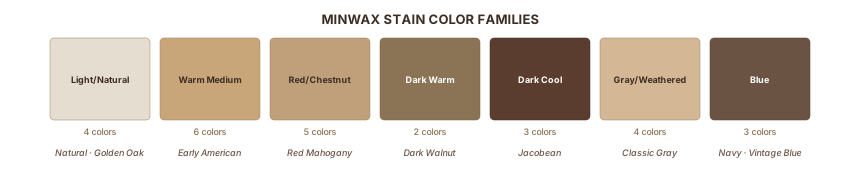
| Light / Natural | Natural, Golden Oak, Puritan Pine, Simply White |
| Warm Medium | Early American, Special Walnut, Provincial, Gunstock, Fruitwood, Ipswich Pine |
| Red / Chestnut | Red Oak (stain), Red Chestnut, Red Mahogany, Cherry, Sedona Red |
| Dark Warm | Dark Walnut, English Chestnut |
| Dark Cool | Jacobean, Ebony, True Black |
| Gray / Weathered | Weathered Oak, Classic Gray, Driftwood, Phantom Gray |
| Blue | Navy, Vintage Blue, Bay Blue |
Part 2: How Wood Species Changes the Color
The same Minwax color looks different on different woods. Stain interacts with the wood's natural undertones, porosity, and density. Denser woods absorb less; softer, more porous woods absorb more. Minwax's species comparison guide documents this across five common species.
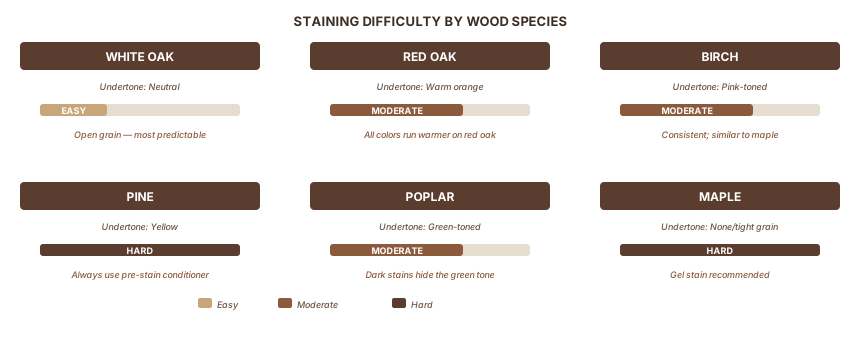
Every wood species has a baseline undertone that mixes with the stain you apply:
| Species | Natural Undertone | Staining Difficulty |
|---|---|---|
| White Oak | Neutral | Easy — most predictable results |
| Red Oak | Red / salmon / orange | Moderate — all colors run warmer |
| Birch | Pink | Moderate — consistent, similar to maple |
| Pine | Yellow | Hard — blotch risk; conditioner required |
| Poplar | Green | Moderate — dark stains mask green well; light stains look odd |
| Maple | None (very tight grain) | Hard — absorbs little stain; blotches with dark colors |
Species Results at a Glance
| Species | Best Minwax Colors | What to Avoid | Notes |
|---|---|---|---|
| White Oak | Any — most forgiving | Nothing off-limits | Open grain takes stain evenly and deeply |
| Red Oak | Early American, Provincial, Special Walnut, Classic Gray, Jacobean, Dark Walnut | Pickled Oak, Golden Pecan (too pink/orange) | All colors run warmer — see Part 3 |
| Pine | Early American, Provincial, Natural, Puritan Pine | Dark Walnut (goes pink-gray), Jacobean (goes gray) | Always use Pre-Stain Conditioner; or switch to Gel Stain |
| Maple | Natural, Golden Oak, Special Walnut | Dark Walnut, Jacobean, Ebony | Dense grain absorbs very little — dark stains blotch and look muddy |
| Poplar | Dark Walnut, Jacobean, Ebony | Light stains (green bleeds through) | Dark stains mask the green undertone dramatically |
| Birch | Dark Walnut, Early American, Special Walnut | Very dark colors (can streak) | More consistent than maple; good results across the medium range |
Pre-Stain Conditioner: When You Need It
Apply Minwax Pre-Stain Wood Conditioner on any blotch-prone species before staining. For a full guide on applying light colors without blotching, see Light Wood Stain. Let it absorb 15–30 minutes, then apply stain before the conditioner dries fully.
Always use on: pine, fir, spruce, alder, cherry, birch
Optional on: poplar, soft maple
Skip on: white oak, red oak, walnut, teak, mahogany
If blotching persists even with conditioner, switch to Gel Stain. It sits on the surface instead of penetrating, so it can't blotch.
Part 3: Minwax Stain Colors on Red Oak
Red oak is the most common hardwood in American homes. It shows up in floors, trim, cabinets, and furniture. It also has a strong salmon-orange undertone that shifts every stain color warmer than the swatch shows. Red Oak Stains covers the color selection process specifically for red oak floors and furniture.
As Hydrangea Treehouse's red oak staining guide points out, most stain charts show results on white oak, not red oak — and the results look meaningfully different. This section documents exactly how each color behaves on red oak specifically.
What Every Major Minwax Color Does on Red Oak
| Minwax Color | Result on Red Oak | Effect Direction | Use For |
|---|---|---|---|
| Natural | Lets redness show fully | Very orange/pink | Raw look only |
| Golden Pecan | Amplifies redness | Very orange | Avoid for neutral results |
| Pickled Oak | Brings out pink/salmon aggressively | Very pink | Generally avoid |
| Gunstock | Enhances amber warmth | Warm honey-orange | Traditional look |
| Puritan Pine | Yellow + redness = orange-yellow | Warm | Avoid if you want brown |
| Golden Oak | Warm honey-orange | Warm | Traditional only |
| Ipswich Pine | Medium warm, reddish | Warm | Traditional look |
| Early American | Warm earthy brown | Balanced warm | One of the best on red oak |
| Special Walnut | Enhances warmth; blends with grain | Warm brown-red | Classic; 2026 COTY; excellent |
| Fruitwood | Warm amber-brown | Warm | Good for traditional |
| Colonial Maple | Warm amber-brown | Warm | Traditional |
| Provincial | Neutral medium brown | Balanced | Most versatile on red oak |
| Nutmeg | Balanced neutral warm brown | Balanced-warm | Great for railings and trim |
| English Chestnut | Medium brown, slightly cooler | Neutral-warm | Decent on red oak |
| Red Mahogany | Deep reddish-brown | Very warm-red | Traditional / antique only |
| Cherry | Accentuates redness | Very warm-red | Avoid for neutral |
| Weathered Oak | Counterbalances redness; adds gray | Cool-light | Best used as a mixing base |
| Classic Gray | Mutes redness noticeably | Gray-brown | Good for contemporary look |
| Driftwood | Soft gray-beige | Cool-light | Subtle gray; good for modern |
| Phantom Gray | Cool balanced gray | Gray | Scandi / modern look |
| Dark Walnut | Adds depth; amplifies warmth | Rich dark warm | Good for dramatic warm finish |
| Jacobean | Green undertones neutralize red | Dark flat-brown | Popular neutralizer; modern floors |
| Ebony | Near-opaque dark | Near-black | Modern / dramatic |
| True Black | Very dark | Black | Dramatic only |
Pick by the Look You Want
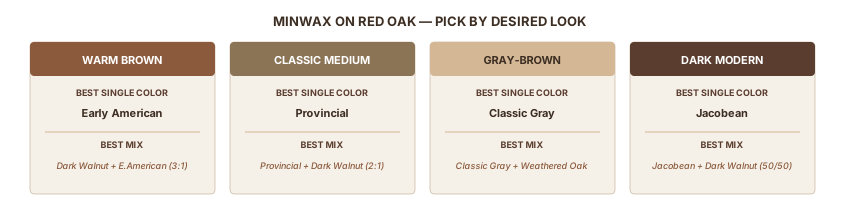
| Desired Look | Best Single Color | Best Mix |
|---|---|---|
| Rich warm brown | Early American | Dark Walnut + Special Walnut (50/50) |
| Classic medium brown | Provincial | Provincial + Dark Walnut (2 parts : 1 part) |
| Contemporary neutral | Nutmeg | Special Walnut + Classic Gray + Weathered Oak (equal parts) |
| Cool gray-brown | Classic Gray | Classic Gray + Weathered Oak (50/50) |
| Gray-washed / rustic | Weathered Oak | Classic Gray + Weathered Oak |
| Dark dramatic warm | Dark Walnut | Dark Walnut + Early American (3:1) |
| Dark neutral / modern | Jacobean | Jacobean + Dark Walnut (50/50) |
| Near-black | Ebony | — |
Part 4: Application Quick Reference
Official Specs — Minwax Wood Finish (Oil-Based)
All values below come from the Minwax Wood Finish technical data sheet and the Minwax staining how-to guide.
| Spec | Value |
|---|---|
| Minimum temperature | 65°F (surface and air) |
| Application method | Brush, foam brush, or lint-free cloth |
| Penetration time | 5–15 minutes (longer = darker) |
| Dry to touch | 2 hours |
| Recoat (second color coat) | 2–3 hours |
| Ready for topcoat | 6–8 hours |
| Standard coats | 1 (2nd coat allowed for deeper color) |
| Coverage | 500–600 sq ft per gallon |
| Cleanup | Mineral spirits |
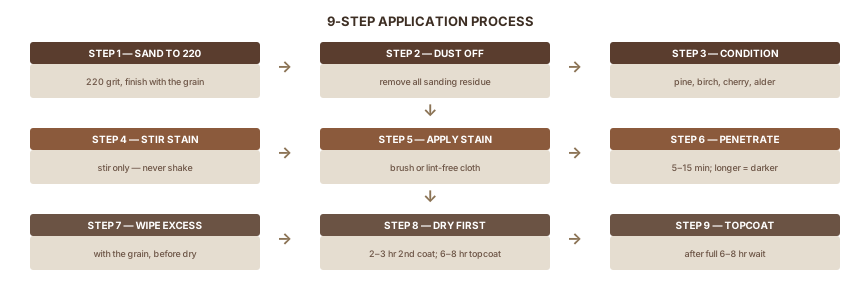
Step-by-Step Application
- Sand to 220 grit, finishing with the grain — see Woodworking Sanders for the full grit progression by finish type
- Dust off thoroughly — remove all sanding residue
- Apply Pre-Stain Conditioner if working with pine, cherry, birch, or alder
- Stir the stain — do not shake, stir only
- Apply stain generously with brush, foam brush, or lint-free cloth
- Let it penetrate 5–15 minutes (test on scrap first to hit your target shade)
- Wipe off all excess in the grain direction before the stain dries on the surface
- Let dry 2–3 hours before a second coat; 6–8 hours before topcoat
- Apply topcoat once stain is fully dry
Rules Worth Memorizing
- Do not let stain dry on the surface before wiping — causes topcoat adhesion failure
- Do not apply a topcoat before stain fully dries
- Do not shake the can — stir
- Remove all metal hardware first — stain discolors metal permanently
- Stain provides color, not protection — always topcoat
Part 5: Which Minwax Formula to Choose
Minwax makes eight different stain formulas. Most buyers only need to choose between three:
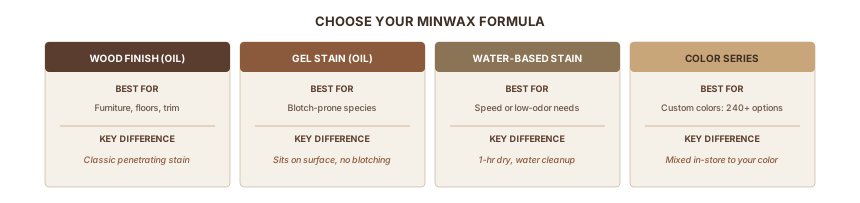
| Formula | Best For | Key Difference |
|---|---|---|
| Wood Finish (oil-based) | Most projects: furniture, floors, trim | Classic penetrating stain; 36 colors |
| Gel Stain | Blotch-prone species (pine, maple, alder); vertical surfaces | Sits on surface, not penetrating — no blotching |
| Water-Based Semi-Transparent | Speed-critical projects; low-odor needs | 1-hour dry time; 200+ colors; water cleanup |
| Color Series (oil) | Custom colors not in the standard line | 240+ tintable colors, mixed in-store |
When to choose Gel Stain over Wood Finish:
According to the Minwax Gel Stain product page, Gel Stain sits on the surface rather than soaking in. This prevents blotching on difficult species (pine, alder, maple, soft maple) and works on fiberglass, metal, and previously finished wood. The tradeoff is longer dry time: 8–10 hours versus 2–3 hours for oil-based. If you've tried wood conditioner and still see blotching, Gel Stain solves the problem.
Part 6: Topcoat Pairing
Stain provides color only. It offers no protection against scratches, water, or wear. You always need a topcoat.
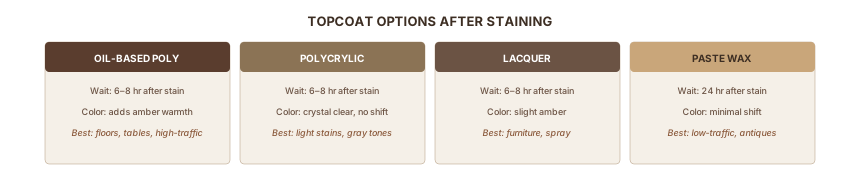
| Topcoat | Wait After Stain | Color Effect | Best For |
|---|---|---|---|
| Oil-based polyurethane | 6–8 hours | Adds amber/warmth | Durability; floors; tables |
| Polycrylic (water-based poly) | 6–8 hours | Crystal clear; no color shift | Light stains; gray tones; painted looks |
| Nitrocellulose lacquer | 6–8 hours | Slight amber | Furniture; spray application |
| Paste wax | 24 hours | Minimal color change | Low-traffic pieces; antiques |
Important for red oak with gray stains:
If you chose Classic Gray, Weathered Oak, or Phantom Gray to cool down red oak's redness, use Polycrylic (water-based), not oil-based poly. Oil-based polyurethane adds amber over time and gradually undoes the gray effect.
See Applying Polyurethane for the complete topcoat guide: product choices, brush technique, between-coat sanding, and rubbing out.
Sources
This guide draws on Minwax manufacturer documentation, flooring industry species-testing data, and community staining records for red oak specifically.
- Minwax Wood Finish product page — color catalog and application specifications
- Minwax learning center — staining how-to — step-by-step application guide
- Minwax stains by wood species — documented species comparison results
- Minwax Gel Stain product page — gel stain formula and use cases
- Minwax Color of the Year 2026 — Special Walnut selection
- A-American Custom Flooring color chart — classic 24-color reference with number codes
- Hydrangea Treehouse — staining red oak floors — red oak staining results and species comparison context