
How to Use This Guide
A router without jigs cuts mostly by feel. This guide covers the four jigs that change that: the ones every woodworker with a router should build before buying anything else.
If you want the framework first: Read Part 1 (why jigs matter) and Part 2 (the overview table).
If you're ready to build: Jump straight to Part 3 (T-square dado jig — build this one first), Part 4 (circle-cutting jig), or Part 5 (template jig and guide bushing).
If a cut just went wrong: Part 6 covers common mistakes and feed direction.
Router Jig at a Glance
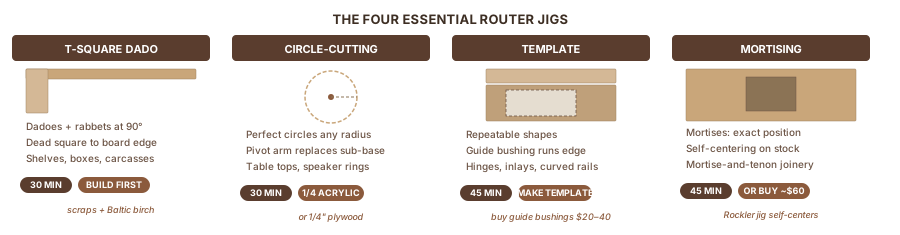
Four shop-made jigs cover 90% of what woodworking router jigs do: the T-square dado jig, the circle-cutting jig, the template jig with guide bushing, and the mortising jig. All four build from scrap material in under an hour each and pay for that hour on the second use.
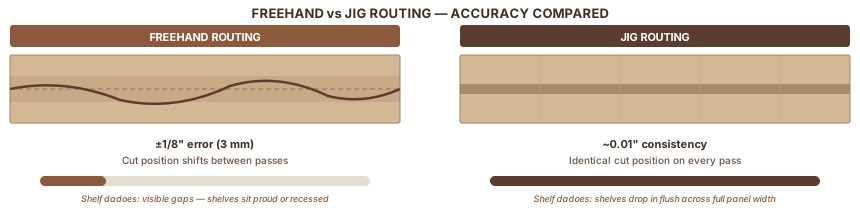
| Accuracy advantage | Jig routing achieves ~0.01" consistency; freehand risks 1/8" error |
|---|---|
| First jig to build | T-square dado jig — 30 minutes from scraps, used on every shelf project |
| Circle jig arm length | (max diameter ÷ 2) + 3 inches |
| Guide bushing offset | (bushing outside diameter − bit diameter) ÷ 2 |
| Maximum depth per pass | 1/4" — use 1/8" for the cleanest cuts |
| Best jig material | Baltic birch for fences; MDF for one-use templates; acrylic for long-lived templates |
In this guide:
- Why jigs beat freehand routing
- The four essential woodworking router jigs
- T-square dado jig — specs and build steps
- Circle-cutting jig — specs and build steps
- Template jig and guide bushing — how the offset works
- Materials, feed direction, and common mistakes
Part 1: Why Jigs Beat Freehand Routing
The gap between a router that cuts okay and one that cuts repeatably is a jig. If you're new to routers, Wood Routers covers router types, specs, and the first cuts to make. Freehand routing constrains the cut only with your grip. A spinning router bit generates enough lateral force to deflect even a confident hand. A jig shifts that constraint to a fixed reference plane. The cut follows the jig, not your muscles.
According to Fine Woodworking's analysis of fixed-base router jigs, jig routing achieves roughly 0.01" consistency on repeat cuts. Freehand routing risks 1/8" error on the same cut made twice in a row. On shelf dadoes that have to match across a full panel, or mortises that have to fit their tenons, that 1/8" is the difference between a tight fit and a visible gap.
Time also favors jigs. A T-square dado jig takes 30 minutes from scrap material. If it saves 10 minutes of layout and test-fitting on each dado, three shelf dadoes pay it back. Every dado after that is free.
When to use a jig
| Situation | Reach for | Because |
|---|---|---|
| Same cut repeated 2+ times | Jig | Setup pays back immediately |
| Cut within 1/16" tolerance | Jig | Human error exceeds that threshold |
| Mortise, dado, rabbet | Jig | Reference edge needed |
| Any cut where error scraps the piece | Jig | Too expensive to fix freehand |
| Quick chamfer on a corner | Freehand | Tolerance is forgiving |
| Decorative freehand profile | Freehand | Intentional variation is the point |
Part 2: The Four Essential Jigs
These four jigs cover 90% of router work. Build them in order: T-square first because you'll use it on the next project, then the others as the work demands.
| Jig | What it does | What it unlocks | Build time | Build or buy? |
|---|---|---|---|---|
| T-square dado jig | Dadoes and rabbets at 90° to board edge | Shelving, boxes, cabinet carcasses | 30 min | Always build |
| Circle-cutting jig | Perfect circles at any set radius | Round table tops, clock faces, speaker rings | 30 min | Always build |
| Template jig | Repeatable shapes from a fixed template | Hinge mortises, hardware recesses, matching parts | 45 min (template only) | Build template; buy guide bushings |
| Mortising jig | Mortises of exact length, width, position | Mortise-and-tenon joinery | 45 min or buy | Build simple or buy Rockler (~$60) |
Build the T-square dado jig first. It's the fastest build and the most-used jig in most shops. If you only build one jig after reading this guide, build that one.

Part 3: The T-Square Dado Jig
A dado is a cross-grain groove cut into a board. It's the standard joint for mounting shelves in a bookcase, dividers in a cabinet, or the bottom in a box. The T-square jig makes every dado dead square to the board edge and positions it exactly where you set the fence, no measuring tape required on the second cut.
What you need
Parts:
- Fence: 3/4" × 4" × 24" Baltic birch plywood (make it longer if you dado panels wider than 24")
- Crossbar: 3/4" × 3" × 12" solid hardwood or Baltic birch plywood
- Hardware: 1-1/4" screws and wood glue
Tools: Table saw or circular saw to cut parts, drill, square, clamps.
Bit: 3/8" or 1/2" straight bit. Popular Woodworking's T-square dado jig guide recommends a 3/8" bit — it handles 1/2" plywood and thicker stock with two passes, giving you finer control than a full-width bit. A 3/4" bit cuts nominal 3/4" plywood dadoes in one pass if you prefer speed.
Build steps
- Cut fence and crossbar to dimension. Both pieces must be straight. Warped jig parts produce warped dadoes.
- Lay crossbar flat on bench. Set fence perpendicular to crossbar at one end. Check with a reliable square on two faces.
- Clamp in place, drill pilot holes, glue and drive 1-1/4" screws. Let glue cure fully before using.
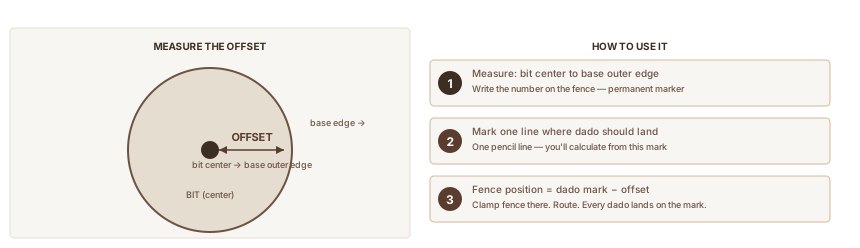
- Calibrate the offset. Measure from the center of your router bit to the outside edge of the router base. Write this measurement on the fence in permanent marker. This number tells you where to clamp the fence to position a dado exactly where you want it.
Using the T-square jig
- Mark the dado location on your board (one pencil line is enough).
- Subtract the router offset from your mark. Clamp the crossbar against the board edge at that position. The jig should be positioned so the bit will land exactly on your pencil line.
- Double-clamp the fence to the board surface.
- Set bit depth to 1/8" for the first pass.
- Feed the router right-to-left (against bit rotation) from the near edge to the far edge of the board.
- Lower the bit 1/8" and repeat. Stop when you reach the target depth (usually 3/8" for shelf dadoes in 3/4" stock).
- Test-fit a shelf before changing anything.
Before routing a real project: Run a test dado in scrap. Check with your square. If it's off, you have a measuring error in the offset — remeasure and re-mark.
What this jig unlocks
Every bookcase, cabinet, box, and drawer with a bottom uses dadoes or rabbets. With this jig and a router, you can dado any panel up to the length of your fence in under 5 minutes per dado. That's the same result as a dado stack on a table saw without the setup time.
Part 4: The Circle-Cutting Jig
A circle-cutting jig turns the router into a compass. (For a dedicated guide to this specific jig, see Circle Jig for a Router.) One end of a pivot arm pins to the center of your circle; the router at the other end orbits around it. The radius from pivot to bit edge sets the circle diameter exactly. No freehand circles come out round — this jig does.
What you need
Parts:
- Pivot arm: 1/4" plywood or 1/4" acrylic, cut to arm length (see formula below)
- Pivot hardware: 1/8" or 3/16" brad point bit for the workpiece hole; short screw or nail as pivot pin
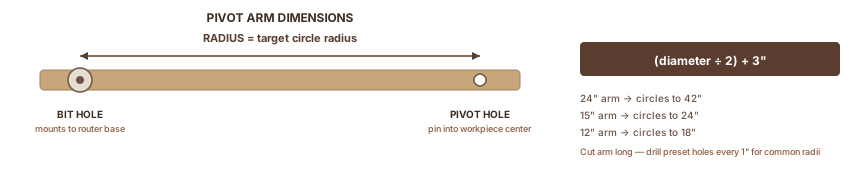
Arm length formula: (maximum diameter you'll cut ÷ 2) + 3 inches. Family Handyman's circle jig guide uses this rule: a 24" arm handles circles up to 42" diameter; a 15" arm handles up to 24" diameter.
Best material: 1/4" acrylic. It's stiffer than thin plywood, shows pencil marks easily, and guide lines stay visible under the router.
Build steps
- Cut the arm to your chosen length.
- At the far end, drill a 3/8" hole — this is the pivot hole.
- At the near end, drill a hole matching your router bit diameter. This is where the bit passes through.
- To attach to router: remove the factory sub-base (usually 4 screws). Use those same holes to mount the pivot arm directly to the router base. The bit-hole aligns with the bit; the arm extends to the far side.
- Optional: drill additional 3/8" holes every 1" along the arm to preset common radii.
Cutting circles
- Find the center of your circle. Mark it clearly. Drill a 1/8" pilot hole at center if the workpiece can have a hole; use a brad point in double-sided tape if not.
- Set the radius: measure from pivot hole (near edge of bit, not center) to the distance equal to your target radius. Mark this point on the arm and drill a second 3/8" hole if you didn't drill preset holes.
- Insert pivot pin (screw or nail) through arm into workpiece center.
- Set bit depth to 1/8".
- Feed counterclockwise (conventional routing on outside edge). One full orbit per pass.
- Lower bit 1/8" and repeat. 3/4" stock takes 4-5 passes.
Taking 1/4" or more per pass on circle cuts causes tearout on the perimeter, especially across grain. Four 1/8" passes are faster to sand than one heavy pass.
Part 5: The Template Jig and Guide Bushing
Template routing turns the router into a duplicator. A shaped router template clamps to the workpiece; a guide bushing (a collar in the router baseplate) runs against the template edge, holding the bit at a fixed distance from the template. Every cut matches the template exactly, across as many pieces as you need.
Production carpentry cuts hinge mortises this way. Inlay recesses get matched to their inlay pieces this way. Furniture makers producing identical curved legs or rails use a single template and cut them all the same.
What guide bushings are
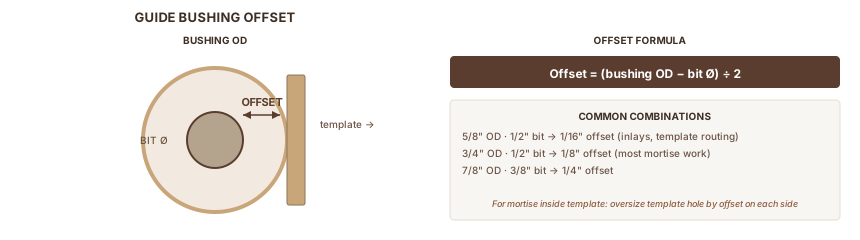
Guide bushings thread into the router baseplate, surrounding the bit with a short metal barrel. When you press the router into a template cutout, the barrel contacts the template edge. The bit cuts inside the barrel's footprint, offset from the template edge by a fixed amount determined by the bushing size.
Most Porter-Cable style bases use a standard 1-3/16" OD mounting flange. As Lee Valley's router template guide overview explains, most router accessory brands sell guide bushing sets — typically 5-8 bushings at various barrel diameters for $20-40.
The offset calculation
The offset is the distance between the template edge and the cut edge. A wrong offset produces mortises that don't fit their hardware.
Formula (from Katz-Moses Tools' guide bushing reference and Wealden Tool's cutter offset guide):
Offset = (bushing outside diameter − bit diameter) ÷ 2
Three common bushing/bit combinations:
| Bushing OD | Bit diameter | Offset | Use case |
|---|---|---|---|
| 5/8" | 1/2" | 1/16" | Template routing, inlays |
| 3/4" | 1/2" | 1/8" | Most mortise work |
| 7/8" | 3/8" | 1/4" | Wider mortises, hardware recesses |
How to adjust your template for the offset:
- Cutting INSIDE the template (mortise, recess): make the template hole LARGER than the finished cut by the offset on each side. For a 1/8" offset, oversize the template rectangle by 1/8" on all four sides (1/4" total per dimension).
- Routing OUTSIDE the template (pattern routing, matching parts): make the template SMALLER than the finished piece by the offset. For 1/8" offset, undersize the template by 1/8" on all four sides.
Template materials
Template material choice scales with how often you'll reuse it:
- MDF (1/4"): One-off templates. Cheap, flat, easy to cut. Avoid in humid shops — MDF swells and the edges lose accuracy.
- Baltic birch (1/4"): Templates you'll use dozens of times. Holds its shape in humidity, takes wear well.
- Acrylic (1/4"): Smoothest guide surface for the bushing, lowest friction, pencil lines show through for layout. Costs more to cut — use a fine-tooth blade or a router bit.
Sand all template edges to 120-grit before routing. Any rough spot or burr on the template edge transfers directly to the cut.
Hinge mortise walk-through
Hinge mortises are the clearest example of how the offset calculation works — and where getting it wrong is immediately visible. Fine Homebuilding's hinge mortise jig guide walks through this method in detail.
- Measure the hinge leaf: length, width, thickness.
- Calculate template dimensions: add offset to all four sides of the hinge rectangle. For a 3.5" × 3.5" hinge with a 1/8" offset, the template hole is 3.75" × 3.75".
- Cut the template hole in 1/4" MDF. Sand edges smooth.
- Clamp template to door stile at the hinge location. Verify position before routing.
- Install guide bushing matching your calculation (e.g., 3/4" OD bushing).
- Set bit depth: template thickness + hinge leaf thickness. For 1/4" MDF template + 3/32" hinge, depth = approximately 11/32".
- Route the perimeter first; then clear the center. Take the full depth in one or two passes — hinge mortises are shallow enough.
- Test-fit the hinge. A well-cut mortise allows the leaf to sit flush with no gaps.
Dedicated mortising jig
For mortise-and-tenon joinery — deeper mortises, repeated at consistent positions across multiple workpieces — a dedicated mortising jig makes more sense than a general template. The key feature: self-centering on stock thickness. Rather than measuring from one face, the jig registers from both faces simultaneously, placing the mortise on centerline regardless of stock variation.
Build option: two hardwood fences rabbeted together, spaced to grip your stock, with adjustable stops for mortise length. Build time: 45-60 minutes. Buy option: the Rockler mortising jig (~$60) handles 3/8" to 1-1/2" wide mortises and self-centers automatically.
Bit for mortises: a spiral upcut bit, 1/4" or 3/8" diameter, clears chips efficiently. Plunge in 1/8" increments. Chisel the round corners square for draw-bore or traditional joinery.
Part 6: Materials, Feed Direction, and Mistakes
Jig material selection
AllFlavor Workshop's jig materials guide breaks down the tradeoffs:
| Material | Best for | Avoid for |
|---|---|---|
| Baltic birch plywood | Fences, crossbars, permanent jigs | — |
| 1/4" MDF | One-use templates | Humid shops, structural parts |
| 1/4" acrylic | Reusable templates, circle arms | — |
| Hard maple or oak | Fences, guide rails | Large templates (too expensive) |
| Standard CDX plywood | Nothing — don't use for jigs | Everything |
Match material to how many times you'll use the jig. A template you'll cut once gets 1/4" MDF. A fence jig you'll use for years gets Baltic birch.
Feed direction
Router bits spin clockwise when viewed from above. Feed the router against that rotation — this is conventional routing, and it keeps the bit pulling the router into the fence or template rather than away from it. Woodcraft's feed direction guide covers this in full.
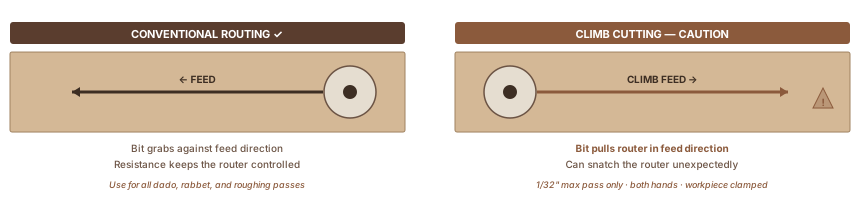
Conventional routing: Feed right-to-left on inside cuts (dadoes, grooves). Feed counterclockwise on outside edges. The bit pushes back against your motion, keeping you in control.
Climb cutting: Feed with rotation. The bit pulls the router forward and produces a smoother edge because it cuts downhill to the grain. It can also yank the router unexpectedly. Use only for very light finishing passes, 1/32" or less, with both hands gripping firmly and the workpiece clamped. Never climb-cut on a roughing pass.
Common mistakes
1. Taking too much per pass. Exceeding 1/4" depth per pass strains the motor, creates tearout, and makes the router harder to control on the jig. Use 1/8" passes and the results will be cleaner and faster to sand.
2. Not securing the workpiece. A board that shifts during routing ruins the cut and is dangerous. Clamp on two sides at minimum. Use bench dogs if available.
3. Skipping the bushing offset calculation. Templates made without the offset produce mortises that are 1/8" too small (or too large). Calculate before cutting the template, not after fitting the hardware.
4. Using CDX plywood or warped stock for jig bodies. A fence that isn't straight produces dadoes that aren't straight. Use Baltic birch or hardwood for any jig part that needs to be a reference edge.
5. Rerouting to correct a missed cut. If a dado is 1/16" off position, a second routing pass usually makes it worse. Set up correctly, rout once.
6. Routing freehand when a template would take 20 minutes to make. If you're cutting the same hinge mortise eight times (four door hinges, two locations each), make the template. The first four are the payback; the second four are pure efficiency.
Sources
Research for this guide drew on plans, technique articles, and manufacturer documentation from woodworking publishers and tool makers, listed in order of first citation above.
- Fine Woodworking — 4 Jigs for a Fixed-Base Router — jig accuracy analysis and construction overview
- Popular Woodworking — 4 Simple, Shop-Made Router Jigs — T-square dado jig build specs and bit selection
- Family Handyman — How to Make a Router Circle Jig — circle jig arm length formula and build steps
- Lee Valley — Router Template Guides — guide bushing system, mounting standards, bushing sets
- Katz-Moses Tools — Guide Bushings 101 — offset formula and applications
- Wealden Tool — Guide Bush Cutter Offset — offset formula derivation
- Fine Homebuilding — Easy Router Jig for Perfect Hinge Mortises — hinge mortise template application
- Rockler — Easy Mortising Router Jig — commercial mortising jig specs and self-centering mechanism
- AllFlavor Workshop — Materials for Woodworking Jigs — Baltic birch vs MDF vs acrylic comparison
- Woodcraft — Understanding Router Feed Direction — conventional vs climb cutting
- Fine Woodworking — How to Build a Dado Jig — T-square jig construction details
- Wood Shop Diaries — Circle Jig for a Router — arm construction and pivot pin setup
Tools Used
Also Referenced
Tagged
How We Research
We don't take affiliate revenue or accept review units. Picks come from multi-source research — manufacturer specs, OSHA / EPA / ASTM regs, and long-form practitioner threads — plus Ahmed's hands-on use where relevant. When we recommend something, we explain why.
Up Next
Trim Router vs Full-Size Router: When Each One Is Enough
POWER TOOLS · Intermediate