
How to Use This Guide
This is a project guide. You'll build a real, furniture-grade hardwood dog crate, not assemble flat-pack. The example build fits a large dog (Lab or Shepherd). Use the sizing table in Part 1 to adjust for your dog.
In this guide:
- Size the crate for your dog — interior dimensions and slat spacing rules
- Choose wood and finish — species, safety, and specific products
- Cut list and hardware for a medium/large build
- The complete build sequence — seven steps, zero guesswork
- Design variations to customize the build
Prerequisites: You need a circular saw (or miter saw), a drill, a pocket hole jig, clamps, and a tape measure. No table saw required.
Hardwood Dog Crate at a Glance
A furniture-grade hardwood dog crate you can build in one weekend. It works as a side table or console and costs $80–300 in materials.
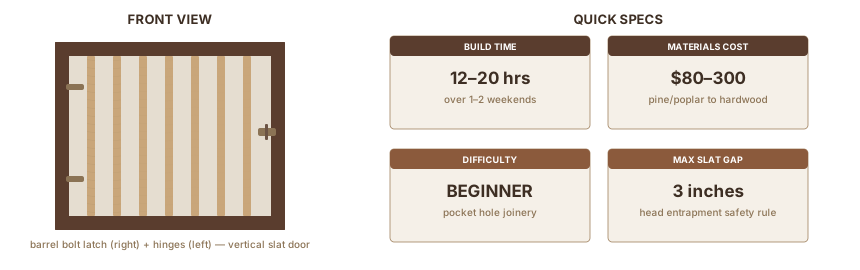
| Build time | 12–20 hours over 2 weekends |
| Materials cost | $80–300 (pine/poplar to oak) |
| Difficulty | Beginner (pocket hole joinery) |
| Interior sizing | Dog body length + 4–6 inches |
| Pet-safe finishes | Water-based poly, Odie's Oil, shellac (once fully cured) |
| Slat spacing max | 3 inches (head entrapment safety rule) |
Part 1: Sizing the Crate for Your Dog
The crate needs to fit your specific dog, not a generic size from a box. Too small and the dog can't stand up or turn. Too large and the crate stops feeling like a den.
The Sizing Formula
Measure two things on your dog:
- Body length: nose to base of tail (not tip of tail)
- Shoulder height: floor to the top of the shoulders
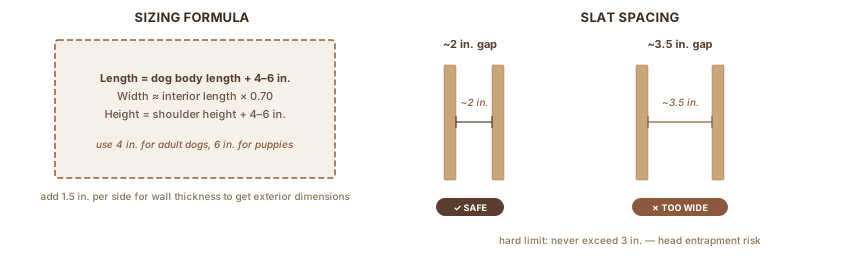
Add 4–6 inches to each measurement. That's your interior length and interior height. Use 4 inches for an adult dog whose growth is done, 6 inches for a puppy or a breed with a long back.
Interior width: roughly 70% of interior length works for most breeds. A 36-inch-long Lab needs about 24–26 inches of interior width.
Crate Dimensions by Dog Size
Dimensions sourced from PetSmart's crate size chart and the Diggs Pet sizing guide, cross-referenced with Pet Crates Direct breed data.
| Dog Size | Breed Examples | Dog Weight | Interior L | Interior W | Interior H |
|---|---|---|---|---|---|
| Extra Small | Chihuahua, Yorkie, Toy Poodle | Under 10 lbs | 18–22" | 12–14" | 14–16" |
| Small | Cavalier KC Spaniel, Shih Tzu | 10–25 lbs | 24" | 16–18" | 18–20" |
| Medium | Cocker Spaniel, Corgi, Border Collie | 25–50 lbs | 30–32" | 20–22" | 22–24" |
| Large | Lab, Golden Retriever, German Shepherd | 50–90 lbs | 36–42" | 24–28" | 26–30" |
| Extra Large | Great Dane, Bernese Mountain Dog | 90+ lbs | 48"+ | 30–32" | 30–34" |
Woodworker's note: These are interior dimensions. With 3/4" material, add 1.5 inches per side to get exterior dimensions. A 36" interior length with sides that wrap the bottom: 36 + 1.5 + 1.5 = 39" exterior. Write your cut list from the interior dimensions, then do the math once.
Slat Spacing — The Safety Rule
The space between slats is the most safety-critical spec in the whole build. A dog that sticks its head through and can't pull back is in danger.
- Dogs under 20 lbs: 1.5" max between slats
- Dogs 20–50 lbs: 2" max
- Dogs 50+ lbs: 2.5–3" max
- Hard limit for any build: never exceed 3 inches
Cut a scrap block to your target spacing and use it as a spacer during assembly. Consistent spacing takes 30 seconds when you have a spacer block and an hour if you're measuring each gap by hand.
Part 2: Choosing Wood and Finish
Wood Species — Safe and Practical
Every species in the table below is safe for use in a dog crate as finished wood. The finish matters more than the species for pet safety. Sealed wood is not the same as raw wood a dog might chew.
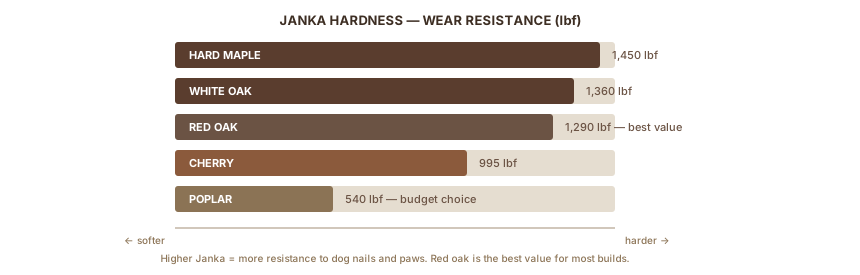
Janka hardness measures resistance to denting. A higher number means a harder surface. It matters here because a dog crate takes real wear: nails, paws, the occasional enthusiastic greeting.
| Species | Janka Hardness | Pet Safety | Cost | Best For |
|---|---|---|---|---|
| Hard Maple | 1450 lbf | Excellent | $$$ | Most durable surface, professional finish |
| White Oak | 1360 lbf | Excellent | $$$ | Furniture-grade, holds up to heavy use |
| Red Oak | 1290 lbf | Excellent | $$ | Best value hardwood, widely available |
| Poplar | 540 lbf | Best | $ | Budget builds, safest raw wood |
| Cherry | 995 lbf | Good | $$$ | Beautiful grain, lighter-use crates |
Pick one: Red oak for a furniture-quality result at the lowest hardwood price. Poplar if you're on a tight budget or building for a small dog. Both are at most lumber yards.
Never use pressure-treated lumber. The Center for Animal Rehab's non-toxic wood reference flags copper-based preservatives (ACQ, CA) as toxic to animals. Painting over them doesn't help.
If your dog chews: This build assumes a crate-trained dog. An active chewer will destroy any wood crate. Get the training right before you invest in hardwood.
Choosing a Pet-Safe Finish
Nearly every clear wood finish is safe once fully cured. The risk is wet or partially cured finish in a small enclosed space. Dog crates are exactly that space. Stumpy Nubs, a woodworking educator who researched this directly, says it plainly: "If it still smells, it's not fully cured."
Three options that work well for dog crates:
Water-based polyurethane (Minwax Polycrylic, General Finishes High Performance Water Based, Varathane Crystal Clear): most durable, lowest VOC of the poly options. Dries to touch in 2–4 hours. Wait 7 days before light pet use, 30 days for full cure. Apply 3 coats with 320-grit scuff sand between each. Full guide: Applying Polyurethane.
Vermont Natural Coatings PolyWhey: made from whey protein, not petrochemicals. No heavy metals, no formaldehyde, no carcinogenic solvents. Dries in 2 hours. Wait 14 days before large dogs use the crate. Excellent durability. Available in matte, satin, or semi-gloss. ~$40–50/quart.
Odie's Oil: solvent-free, food-safe, all-natural oils and waxes. Zero VOCs. Safe to touch almost immediately, 3–5 day cure before standing liquids. Lower durability than poly, but the safest finish option available. ~$25 for a 9 oz jar (covers ~190 sq ft).
Apply finish with the crate in a ventilated space. Keep pets out of the room during application and during the full cure window.
Part 3: Materials, Cut List, and Hardware
Minimum Tool List
You need these:
- Circular saw or miter saw
- Drill/driver
- Pocket hole jig (Kreg R3 or similar — ~$30)
- Tape measure and speed square
- 4 or more clamps (bar or F-clamps, 12"+ jaw)
- Sandpaper: 80, 120, 180, 220 grit
These help but aren't required:
- Table saw (a circular saw with a straight-edge guide does the same job)
- Random orbital sander
- Brad nailer (holds slats in position while you drive pocket screws)
- Router (edge profiles, decorative details)
Ask the lumber yard: Most hardwood dealers and many big-box stores will rip boards to width for a dollar or two per cut. If you don't have a table saw, have them do it. You're buying the wood anyway.
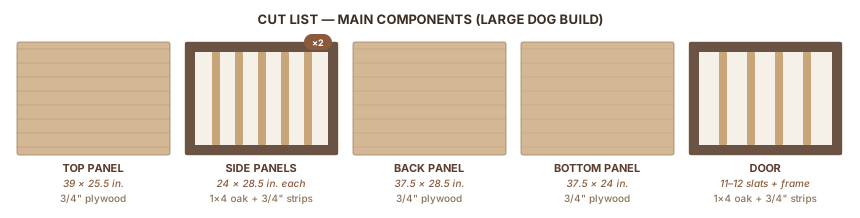
Cut List: Large Dog Crate (36" × 24" × 28" Interior)
This build suits a Lab, Golden Retriever, or German Shepherd. Scale using the sizing table above.
| Part | Qty | Material | Dimensions (L × W × T) |
|---|---|---|---|
| Bottom panel | 1 | 3/4" plywood | 37.5" × 24" |
| Back panel | 1 | 3/4" plywood | 37.5" × 28.5" |
| Top panel | 1 | 3/4" plywood or solid boards | 39" × 25.5" |
| Side frame — top/bottom rails | 4 | 1×4 oak/poplar | 24" |
| Side frame — stiles (vertical) | 4 | 1×4 oak/poplar | 28.5" |
| Side slats | 22–24 | 3/4" × 1.5" strips | 26.5" |
| Door frame — top/bottom rails | 2 | 1×4 oak/poplar | 24" |
| Door frame — stiles (vertical) | 2 | 1×4 oak/poplar | 28.5" |
| Door slats | 11–12 | 3/4" × 1.5" strips | 26.5" |
At 2" spacing, you'll need 22–24 slats per side panel and 11–12 per door. Cut one slat, verify the spacing works, then batch-cut the rest to the same length.
Note on solid wood top: If you use solid boards instead of plywood for the top, account for wood movement. Oak expands roughly 1/4" per 12" of width across the grain seasonally. Attach with figure-eight fasteners (metal clips that let the top float slightly while staying fastened) or elongated screw slots. A rigid glue joint will crack when the wood moves.
Hardware
- T-hinges or strap hinges, 3"–4", matte black: 2 per door (3 for XL dogs)
- Barrel bolt latches, 3": 2 (place at top and bottom of door for large dogs)
- Pocket screws, 1-1/4": 1 box (150 count)
- Wood glue: Titebond II or any PVA glue
- Sandpaper (see tool list)
- Finish of choice
Total hardware cost: $25–45, depending on finish quality of hinges. Build Blueprint's single kennel plan puts the all-in cost at about $175 for a pine build with standard hardware; oak builds run $200–300. If you'd rather commission a custom build, Dailey Woodworks's pricing guide gives a realistic range: $400–1,200 depending on size, species, and design complexity.
Part 4: The Build Sequence
Seven steps. Follow the order. Each step squares and stabilizes the crate for the next one.

Step 1: Assemble the Side Panels
Drill pocket holes in both ends of each top and bottom rail. Kreg's official build plans specify 1-1/4" depth setting for 3/4" stock.
Cut a scrap block to your target slat spacing (2" for a large dog). Lay out one side panel flat on your workbench: set the bottom rail, stack slats with the spacer block between each one, lay the top rail over the tops of the slats.
Don't glue the slats. They're captured between the rails and need to move slightly with humidity changes. Apply glue to the joints where rails meet the outer stiles, then drive pocket screws through the rails into the stiles.
Clamp the assembly and check it's flat while the glue sets. Build both side panels. Let them cure at least 30 minutes before handling, overnight before stressing the joints.
Step 2: Build the Carcass
Drill pocket holes around the edges of the bottom panel.
Stand the two side panels up and attach the bottom panel between them: glue the joint, drive 1-1/4" pocket screws through the bottom panel into the bottom edge of each side panel. Clamp.
Attach the back panel to the rear edges of both side panels using the same process. The back panel makes the whole assembly rigid. Before the glue sets, check your diagonal measurements: measure corner to corner across both diagonals. Equal diagonals mean a square crate. If they're off, apply light clamp pressure at the longer diagonal until they match.
Attach the top panel last.
Step 3: Build and Hang the Door
Build the door frame exactly like the side panels: pocket holes in the rails, slats between rails (same spacing), stiles on the outside.
Attach hinges to the door frame first. Hold the door in the opening with a 1/16" gap on all four sides. That gap keeps the door from binding when the wood swells in humid weather. Mark the hinge positions on the carcass face, remove the door, screw the hinge leaves to the carcass, rehang, and test the swing.
Install barrel bolts: one at mid-height for dogs under 50 lbs, one at the top-quarter and one at the bottom-quarter for dogs over 50 lbs. Test the latch: close the door, shoot the bolt, verify it seats without forcing. Dogs cannot operate a slide bolt.
Step 4: First Sand
Sand all surfaces in sequence: 80 grit for rough spots or mill marks, 120 grit overall, 180 grit final. Sand with the grain. Pay attention to slat ends. A sander makes quick work of splinters that a dog's nose will find.
Knock the sharp 90-degree corner where two faces meet: run 120 grit lightly along each edge until it won't catch skin or fur. No router required.
Step 5: Fit Check
Do this before any finish goes on. Put a dog bed or blanket inside. Watch your dog walk in, turn around, and lie down. If anything binds or feels tight, fix it now. Planing a 1/16" off a frame rail with three coats of finish on it is miserable. Planing bare wood takes two minutes.
Check the door: swing it open and closed, latch it, try to push it open from the inside with moderate pressure. Verify the barrel bolt seats without forcing and that the door doesn't bind anywhere around the frame gap.
Step 6: Apply Finish
Remove the door from the crate. Finish the door and the crate body separately. This lets you coat all surfaces uniformly and prevents finish drips from gluing the door shut.
Apply 3 coats of your chosen finish. Between coats: let each coat dry fully, scuff sand with 320 grit, wipe with a tack cloth. The scuff sand dulls the shine so the next coat bites in. Skip it and coats peel.
Cure time before pet use:
- Odie's Oil: 3–5 days
- Water-based poly: 7 days minimum, 30 days full cure
- Vermont Natural Coatings PolyWhey: 14 days for large pets
Zero odor = safe. Any smell = not done curing.
Step 7: Reassemble and Introduce the Dog
Rehang the door after finish is fully cured. Reinstall latches. Leave the door open for the first day and let the dog explore at its own pace. Put something familiar inside, a worn t-shirt or a favorite toy. Don't lock the dog in on day one.
Part 5: Design Variations and Next Builds
Five Styles to Consider
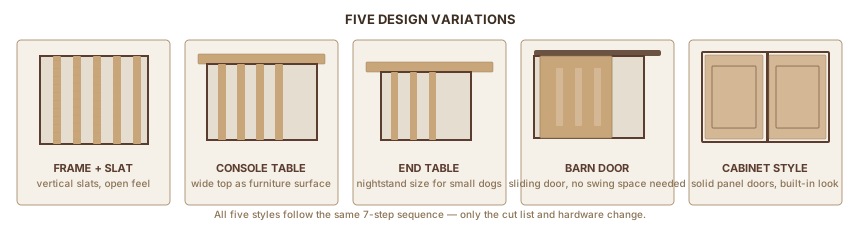
Frame-and-slat — what you just built. Vertical slats, open feel, good ventilation. Works for any dog size. The most common furniture-style crate.
Console table / TV stand — wider build with a solid top that functions as a console table. Two compartments for two dogs. Higher material cost; same build sequence, just wider. Ana White's free plans cover this style with cut lists and photos.
End table style — smaller crate for dogs under 30 lbs, proportioned to work as a nightstand. If it's in the bedroom, this style disappears into the furniture.
Barn door — sliding door instead of hinged. Uses off-the-shelf barn door hardware. Slightly more complex hardware, cleaner look. Best for living rooms where swinging space is limited.
Cabinet style — full face frame construction, panel doors, routed profiles. Looks like built-in furniture. Requires more skills and tools. Woodshop Diaries has a good build log of this approach.
Building for a Different Size
The build sequence is identical regardless of crate size. Only the cut list changes. Use the sizing table in Part 1 plus the material-thickness formula in Part 3 to generate your own cut list.
For a double-width crate: add a vertical center divider panel (same material as the back panel). Add a second door. Both doors can share a center stile on the face frame, or you can leave a center post.
Sources
Dog crate sizing data from pet retailers and veterinary sources, wood safety from animal rehabilitation references, finish specifications from manufacturer documentation, and build techniques from published woodworking plans.
- PetSmart Dog Crate Size Chart — industry-standard interior dimensions by dog weight
- Diggs Pet Crate Sizing Guide — sizing methodology and measurement instructions
- Pet Crates Direct Breed Size Chart — breed-by-breed dimension reference
- Center for Animal Rehab — Non-Toxic Woods — safe and toxic wood species for animals
- Stumpy Nubs — Pet Safe Finishes — cure vs. wet finish safety explained
- Vermont Natural Coatings PolyWhey — whey-based finish specs, cure times, VOC data
- Odie's Oil — food-safe finish composition and cure specifications
- Kreg Tool Barn Door Dog Crate Plan — pocket screw specifications and step-by-step build plan
- Ana White Double Large Console Crate — free plans, hardware lists, console-style design
- Build Blueprint Single Dog Kennel — materials cost benchmarks
- Wood Shop Diaries Dog Crate Cabinet — cabinet-style build documentation
- Dailey Woodworks Kennel Pricing — custom commission pricing reference
Tools Used
How We Research
We don't take affiliate revenue or accept review units. Picks come from multi-source research — manufacturer specs, OSHA / EPA / ASTM regs, and long-form practitioner threads — plus Ahmed's hands-on use where relevant. When we recommend something, we explain why.
Up Next
How to Buy Black Walnut Lumber
WOOD & MATERIALS · Beginner